What is OpenCV?
The reason of you being on this page means either you know what is OpenCV or want to know more about its capabilities and uses. For the uninitiated ones, following is the summary and potential uses of the OpenCV framework.
OpenCV [OpenCV] is an open source computer vision library, The library is written in C and C++ and runs under Linux, Windows and Mac OS X. There is active development on interfaces for Java,Python, Ruby, Matlab, and other languages.
OpenCV was optimized for computational efficiency and with a strong focus on realtime applications. One of OpenCV’s goals is to provide a easy-to-use computer vision infrastructure that helps people build fairly sophisticated vision applications quickly. The OpenCV library contains over 500 functions that span many areas in vision, including factory product inspection, medical imaging, security, user interface, camera calibration, stereo vision, and robotics. Because computer vision and machine learning often go hand in-hand, OpenCV also contains a full, general-purpose Machine Learning Library (MLL).
Getting Started Now …..
Okay enough of the technical mumbo-jumbo, let’s get started and get our hands dirty.
Although I would be compiling and building the OpenCV library on a MacOSx machine, the compilation will be exactly the same for any other operating system.
Step 1:
Goto http://opencv.org/downloads.html and download the latest version for your appropriate OS.
Step 2:
Unzip the tar file in a directory of your choice
Step 3:
Goto the terminal or command window and cd to your unzipped directory.
Step 4:
Make a new directory build : mkdir build
Step 5:
This is a very important step who only want a JAVA build.
type:
cmake -DBUILD_SHARED_LIBS=OFF -D BUILD_NEW_PYTHON_SUPPORT=NO ..
Notice the .. at the end of the command , this make the command to look for the CMakeLists file in the parent directory of the current directory.
Step 6:
Once its confirmed that the configure file is ready, type the following command
make
It will take a while to get the library complied , once the progress reaches 100% you are ready to create you first app.
Step 7:
Just to make sure the compilation has been done correctly. Refer to the http://docs.opencv.org/doc/tutorials/introduction/java_eclipse/java_eclipse.html#java-eclipse
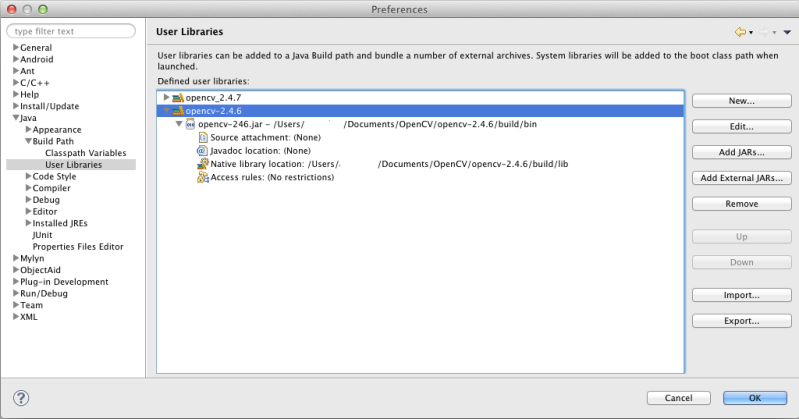
Your user library settings in Eclipse should look something like this
Step 8:
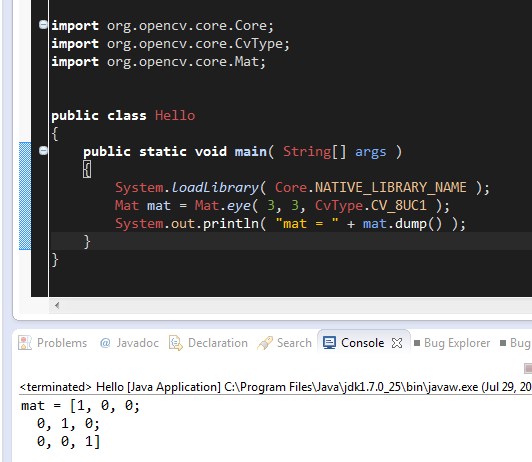
Compile and run a simple test program:
import org.opencv.core.Core;
import org.opencv.core.CvType;
import org.opencv.core.Mat;
public class Hello
{
public static void main( String[] args )
{
System.loadLibrary( Core.NATIVE_LIBRARY_NAME );
Mat mat = Mat.eye( 3, 3, CvType.CV_8UC1 );
System.out.println( “mat = ” + mat.dump() );
}
}
That is it, whenever you start a new project just add the OpenCV user library that you have defined to your project and you are good to go.
The next tutorial will be on creating your first Face Detection app in Java.

