Getting Started with OpenCV (Java, MacOSx)

What is OpenCV?

The reason of you being on this page means either you know what is OpenCV or want to know more about its capabilities and uses. For the uninitiated ones, following is the summary and potential uses of the OpenCV  framework.

OpenCV [OpenCV] is an open source computer vision library, The library is written in C and C++ and runs under Linux, Windows and Mac OS X. There is active development on interfaces for Java,Python, Ruby, Matlab, and other languages.

OpenCV was optimized for computational efficiency and with a strong focus on realtime applications. One of OpenCV’s goals is to provide a easy-to-use computer vision infrastructure that helps people build fairly sophisticated vision applications quickly. The OpenCV library contains over 500 functions that span many areas in vision, including factory product inspection, medical imaging, security, user interface, camera calibration, stereo vision, and robotics. Because computer vision and machine learning often go hand in-hand, OpenCV also contains a full, general-purpose Machine Learning Library (MLL).

Getting Started Now …..

Okay enough of the technical mumbo-jumbo, let’s get started and get our hands dirty.

Although I would be compiling and building the OpenCV library on a MacOSx machine, the compilation will be exactly the same for any other operating system.

Step 1:

Goto  http://opencv.org/downloads.html and download the latest version for your appropriate OS.

Step 2:

Unzip the tar file in a directory of your choice

Step 3:

Goto the terminal or command window and cd to your unzipped directory.

Step 4:

Make a new directory build : mkdir build

Step 5:

This is a very important step who only want a JAVA build.

type:

cmake -DBUILD_SHARED_LIBS=OFF -D BUILD_NEW_PYTHON_SUPPORT=NO ..   

Notice the ..  at the end of the command , this make the command to look for the CMakeLists file in the parent directory of the current directory.

Step 6:

Once its confirmed that the configure file is ready, type the following command

make

It will take a while to get the library complied , once the progress reaches 100% you are ready to  create you first app.

Step 7:

Just to make sure the compilation has been done correctly. Refer to the http://docs.opencv.org/doc/tutorials/introduction/java_eclipse/java_eclipse.html#java-eclipse

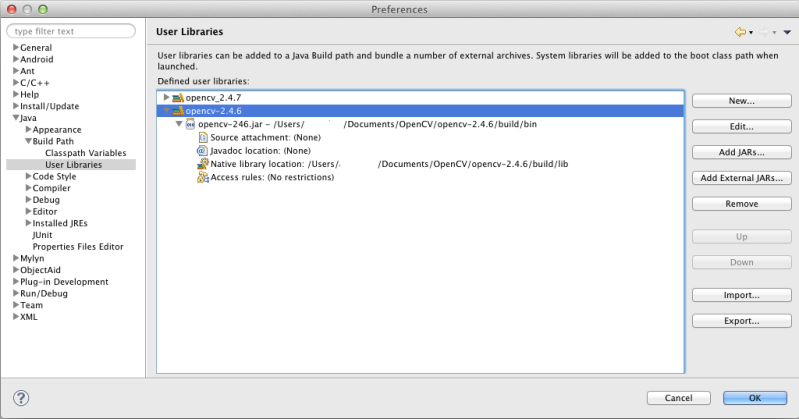
Your user library settings in Eclipse should look something like this

UserLib

Step 8:

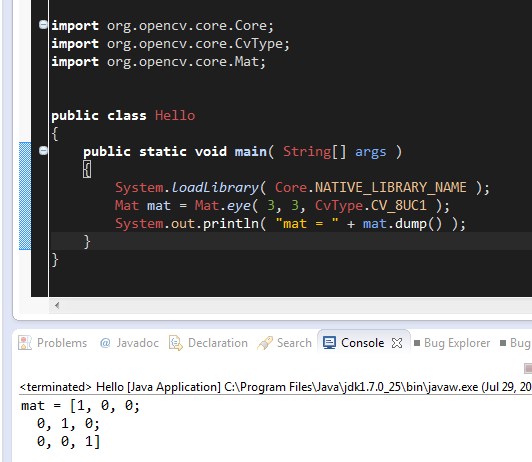
Compile and run a simple test program:

import org.opencv.core.Core;
import org.opencv.core.CvType;
import org.opencv.core.Mat;

public class Hello
{
public static void main( String[] args )
{
System.loadLibrary( Core.NATIVE_LIBRARY_NAME );
Mat mat = Mat.eye( 3, 3, CvType.CV_8UC1 );
System.out.println( “mat = ” + mat.dump() );
}
}

Test-code

That is it, whenever you start a new project just add the OpenCV user library that you have defined to your project and you are good to go.

The next tutorial will be on creating your first Face Detection app in Java.
Creating a Custom Scalable background

The Android SDK provides a very powerful feature which helps you create cool looking backgrounds for your views and widgets. The best part is you do not have to create or resize any images to fit any device screens and the whole thing is based on simple xml files. And you don’t have to waste time in scaling a lot of images.

To create a custom background file create a custom XML file in the /res/drawable folder in the project and later it can be referenced using the android:background attribute of any view or widget.

You would need to use the <shape> element in the XML file and then define the attribute of the shape, the shape can be a rectangle, oval, line or ring. Though the most commonly used shape is rectangle.

In the example below we create a rectangle with rounded corners and use a gradient to color the background. Also the rounded rectangle has a border of 5 dip.

Step 1:

Right click on the res folder in the project >> New >> Android XML File

Step 2: Select the Resource Type as Drawable and select the Root Element as shape and name the file eg. Gradientbg.

This will create a gradientbg.xml under the drawable folder under the res folder and open the XML file in the code window.

Step 3: Modify the xml file as follows:

<?xml version="1.0" encoding="utf-8"?>

<shape xmlns:android="http://schemas.android.com/apk/res/android"

android:shape="rectangle" >

<gradient android:angle="270" android:endColor="#CEECF5" android:startColor="#00BFFF" android:type="linear" >
</gradient>

<corners android:radius="20dip" /><stroke android:width="5dip" android:color="#000" /></shape>

android:shape defines the shape of the background it coud be rectangle,oval,ring or line.

<gradient> tag provides the startcolor and the endcolor and the angle in multiples of 45, also type which could be linear,radial or sweep.

<corners> only applies to the shape rectangle and the radius provides the degree of roundness for the corners.

<stroke> provides a border to the rectangle which has a width and a color.

Once the XML file is compiled it can be used in any view or widget by defining the android:background = “@drawable/gradientbg” where gradientbg is the XML file name.

The following screen shot shows the background applied on the whole activity by applying the background on the root layout.

In the next screenshot the same background is applied on a button widget.

Is apple moving towards extinction?

iMacheads


Apple is going to be removing the YouTube app from the iPhone and the iPad. The separation between Apple and Google is getting wider.

On Monday, Apple released a test version of iOS 6, their newest operating system, and developers quickly noticed that the YouTube app was missing. This is a notable change because the YouTube app has been in the line-up of Apple’s built in apps since the conception of the first iPhone in 2007. Is the removal of the YouTube app the calm before the storm?

Apple said in a statement that “Our license to include the YouTube app in iOS has ended”. They added that owners of the device would still be able to use YouTube by going to their web browser, and that Google was working on a YouTube app that users could use in the future, through the Apple App Store.

YouTube said in a statement…

View original post 247 more words

Dynamically adding widgets to a User interface

Normally the views defined using the XML layout field can be simply inflated by using the setContetntView(R.layout.main).

The following code is used to add a button dynamically:

public void onCreate(Bundle savedInstanceState) {
   super.onCreate(savedInstanceState);

   //Inflate the layout file res\layout\activity_uc.xml

   LinearLayout layout = (LinearLayout)getLayoutInflater().inflate(R.layout.main,null);

   //Initiate a new button

   Button reset = new Button(this);
   reset.setText("Reset Form");

   //Add the new button to the layout

   layout.addView(reset,new LinearLayout.LayoutParams(LayoutParams.FILL_PARENT,

   LayoutParams.WRAP_CONTENT));

   //Attach the view to the window

   setContentView(layout);

}

Interface created using a Layout XML 

Interface created after adding a button dynamically

Creating a One activity Application

Overview

We are going to design a simple application which basically converts between different units of Measurement.  And the user can select an option from a dropdown(called Spinner in Android) and enter the quantity needed to be converted in a Textbox and click on the Convert button and the converted value is displayed in the same textbox(EditText in Android). A Clear button clears the EditText and a Close button closes the application.

We will start with a rough prototype and then build on it in future and try to improve and optimize it in different ways.

Let’s get going

Designing the interface

As can be seen from the requirements the interface would need the following widgets:

1. EditText ( Textbox)

2.TextView (Label)

3. Spinner (Dropdown box)

4. Button

Let’s design a layout in the Eclipse. Open the main.xml in the res/layout directory

And drag and drop the widgets required , start with the LinearLayout from the layouts section. Try to emulate from the highlighted section. Do not worry about the appearance too much.

Once done with the interface, name the widgets properly(By selecting the widget in Outline section and going to properties section) so that you can reference them from the code.

Once you have added the widgets, its time to launch the application and see your work of Art .;)

Of course the buttons or the spinners won’t work because we haven’t added event handlers for them.

Step 2:

Populating the Spinner widget. (Android Spinner, XML resources, Adapter)

We will be populating the Spinner using values from an XML file. This is the best way to decouple the business logic from the User interface. Android provides options to create different types of XML resources , for the time being just goto the res/values and right click on it >> New >> Android XML File

Select the Resource Type as Values and click Finish.

Copy and Paste the XML below. As can be seen from the XML file we have defined 2 arrays :

  1. conversions : Used to populate the spinner.
  2. multipliers: Used in the conversion calculation.
<?xml version="1.0" encoding="utf-8"?>

<resources>

	<string-array name="conversions">

		<item>Pounds to Kgs</span></item>

		<item>Kgs</span> to Pounds</item>

		<item>Kilometers to Miles</item>

		<item>Miles to Kilometers</item>

		<item>Degrees Celsius</span> to Degrees Fahrenheit</span></item>

		<item>Degrees Fahrenheit</span> to Degrees Celsius</span></item>

	</string-array>

	<string-array name="multipliers">

		<item>0.450</item>

		<item>2.20462</item> <!-- Acres to Square Miles -->

		<item>0.621371</item> <!--Atmospheres to Pascals</span>  -->

		<item>1.60934</item> <!--Bars to Pascals</span> -->

		<item>0</item> <!--Degrees Celsius</span> to Degrees Fahrenheit</span> -->

		<item>0</item> <!--Degrees Fahrenheit</span> to Degrees Celsius</span>  -->

	</string-array>

</resources>

Eclipse power tip : To Beautify any code in Eclipse IDE use Ctrl+Shift + f for windows and Command + shift+ f for Mac.

Save the XML file and get back to the code window.

Add the following code

// Getting a reference to the Spinner from the layout

final Spinner spnConversions = (Spinner) findViewById(R.id.conversions);

// Creating the items from the Array resource

ArrayAdapter<CharSequence> aa = ArrayAdapter.createFromResource(this,

R.array.conversions,

android.R.layout.simple_spinner_item);

//Setting the spinner item look from android layouts

aa.setDropDownViewResource(android.R.layout.simple_spinner_item);

// Populating the spinner with the XML data

spnConversions.setAdapter(aa);

Run the application and you should see the items once you click on the small down arrow on the spinner.

Add the following code for attaching a listener to the spinner widget.

AdapterView.OnItemSelectedListener spinlistener = new OnItemSelectedListener() {

public void onItemSelected(AdapterView<?> arg0, View arg1,
int position, long id) {
//save the selected position
MainActivity.this.position = position;
}

public void onNothingSelected(AdapterView<?> arg0) {
// TODO Auto-generated method stub

}
};
//attaching the listener
spnConversions.setOnItemSelectedListener(spinlistener);

The code snippet saves the position of selected item. Declare a private attribute in activity named position.

Next add the listeners for the Clear and the Close buttons.

// Adding listener for the close button

Button btnClose = (Button) findViewById(R.id.close);

View.OnClickListener btnCloselistener = new View.OnClickListener() {

public void onClick(View v) {

//closing the application

finish();

}

};

// Attaching the listener to the button

btnClose.setOnClickListener(btnCloselistener);

// Adding listener for the close button

Button btnClear = (Button) findViewById(R.id.clear);

View.OnClickListener btnClearListener = new OnClickListener() {

public void onClick(View v) {

//clearing the text from EditText

txtValue.setText(“”);

}

};

// Attaching the listener to the button

btnClear.setOnClickListener(btnClearListener);

This finishes the simple application; we will be building on the application in the next coming up tutorials.

Creating a plug and play Android development environment

This one is for the new Android developers or the ones who want to get into Android development. With the steps given below , anyone can create a self-sufficient environment for Android development. It is useful due to the following reasons:

  1. Deploy the environment across many PCs, update the APIs only once and and copy it to other systems.
  2. In case the working environment gets  corrupt , just replace it with the saved installation.

Let’s get going….

Step 1:

Download the latest Eclipse Ide from the Eclipse download site, I prefer the win-32 version even if I have 64-bit system as sometimes it leads to conflict with the JVM.

Step 2:

Download and install the Android SDK from http://developer.android.com/sdk/index.html, it will get installed in C:\Program Files (x86)\Android\Android-SDK. Make sure you know where you are installing the SDK.

  • Once the SDK is installed download all the needed APIs for Different platforms by running SDK Manager.exe from the installation folder.

Step 3:

Open Eclipse and install the ADT plugin .

  • Goto Help>> Install New Software

  • Select the Developer tools option and click on next , Accept the EULA and let it install.

Step 4:

Once the ADT plugin is installed we move to the next step, Goto C:\Program Files (x86)\Android\ and copy or cut the Android-SDK folder and paste it where the Eclipse installation is eg. C:\Data.

Step 5:

The last step is to update the SDK location in Eclipse ,  Go to  Window>> Preferences >> Android  >> SDK Location and update it to the new location where you moved your Android-SDK folder.

Once all the steps are complete you can create a zipped folder from the C:\Android folder and reuse it on other systems or keep it in a secure place for any contingencies later.  🙂

For the newbs who do not want so much configuration, they can download the pre-installed rar file here.

It includes: Eclipse Juno , Android SDK, Android APIs, and the ADT plugin .(Also included is the GIT plugin)

OUYA: A New Kind of Video Game Console

Cool Android gaming console be the first to get it

gameblorg

At first I wasn’t entirely sure how I felt about the OUYA, but it’s starting to look like a pretty legit system. What’s OUYA? So glad you asked.  It’s a console in the making that breaks away from “The Big 3”, using an android based, digital download format, that will be playable on your TV.

I’m still a little conflicted though. I suppose it really depends on where the video game market goes and how well they execute their format. Will this be a commercial success? I really don’t know. But I wouldn’t necessarily want it to be either. A “commercial success” can often feel soulless and cheapened. It also kind of feels like they’re trying to sell us something that we already have. It runs on android. If I really wanted to I could hook up my android tablet to my TV and a controller to that. Granted not…

View original post 415 more words

Activity LifeCycle

The following methods define the entire lifecycle of an activity. By implementing these methods, you can monitor three nested loops in the activity lifecycle:

  • The entire lifetime of an activity happens between the call to onCreate() and the call to onDestroy(). Your activity should perform setup of “global” state (such as defining layout) in onCreate(), and release all remaining resources in onDestroy(). For example, if your activity has a thread running in the background to download data from the network, it might create that thread in onCreate() and then stop the thread inonDestroy().
  • The visible lifetime of an activity happens between the call to onStart() and the call to onStop(). During this time, the user can see the activity on-screen and interact with it. For example, onStop() is called when a new activity starts and this one is no longer visible. Between these two methods, you can maintain resources that are needed to show the activity to the user. For example, you can register a BroadcastReceiver inonStart() to monitor changes that impact your UI, and unregister it in onStop() when the user can no longer see what you are displaying. The system might call onStart() and onStop() multiple times during the entire lifetime of the activity, as the activity alternates between being visible and hidden to the user.
  • The foreground lifetime of an activity happens between the call to onResume() and the call to onPause(). During this time, the activity is in front of all other activities on screen and has user input focus. An activity can frequently transition in and out of the foreground—for example, onPause() is called when the device goes to sleep or when a dialog appears. Because this state can transition often, the code in these two methods should be fairly lightweight in order to avoid slow transitions that make the user wait.

Following  figure illustrates these loops and the paths an activity might take between states. The rectangles represent the callback methods you can implement to perform operations when the activity transitions between states.

Starting an activity for a result

Sometimes, you might want to receive a result from the activity that you start. In that case, start the activity by calling startActivityForResult() (instead of startActivity()). To then receive the result from the subsequent activity, implement the onActivityResult() callback method. When the subsequent activity is done, it returns a result in an Intent to your onActivityResult() method.

For example, perhaps you want the user to pick one of their contacts, so your activity can do something with the information in that contact. Here’s how you can create such an intent and handle the result:

private void pickContact() {

// Create an intent to "pick" a contact, as defined by the content provider URI

Intent intent = new Intent(Intent.ACTION_PICK, Contacts.CONTENT_URI);

startActivityForResult(intent, PICK_CONTACT_REQUEST);

}

@Override

protected void onActivityResult(int requestCode, int resultCode, Intent data) {

// If the request went well (OK) and the request was PICK_CONTACT_REQUEST

if (resultCode == Activity.RESULT_OK && requestCode == PICK_CONTACT_REQUEST) {

// Perform a query to the contact's content provider for the contact's name

Cursor cursor = getContentResolver().query(data.getData(),new String[] {Contacts.DISPLAY_NAME}, null, null, null);

if (cursor.moveToFirst()) { // True if the cursor is not empty

int columnIndex = cursor.getColumnIndex(Contacts.DISPLAY_NAME);

String name = cursor.getString(columnIndex);

//         Do something with the selected contact's name...

}

}

}


This example shows the basic logic you should use in your onActivityResult() method in order to handle an activity result. The first condition checks whether the request was successful—if it was, then the resultCodewill be RESULT_OK—and whether the request to which this result is responding is known—in this case, therequestCode matches the second parameter sent with startActivityForResult(). From there, the code handles the activity result by querying the data returned in an Intent (the data parameter).

What happens is, a ContentResolver performs a query against a content provider, which returns a Cursorthat allows the queried data to be read. For more information, see the Content Providers document.

For more information about using intents, see the Intents and Intent Filters document.

Starting an Activity

What is an Activity?

An activity in android is the user interface that is used to interact with the user. Simply said any android application is made up of one or more activities(screens). The activity is made up of Viewgroups and views. Viewgroups are basically layout for the screen eg. Linearlayout is used to layout the widgets (buttons, text-box etc. ) in a linear manner ie. either horizontally or vertically.   Any activity could start any other activity.

How to start?

Its very important to declare the activity in the android manifest file (AndroidManifest.xml) to make it visible to the system. The declaration looks something like this:

You can start another activity by calling startActivity(), passing it an Intent that describes the activity you want to start. The intent is the heart of the android system it is used to start activities , services and  broad cast receivers. The intent specifies either the exact activity you want to start or describes the type of action you want to perform (and the system selects the appropriate activity for you, which can even be from a different application). An intent can also carry small amounts of data to be used by the activity that is started.

When working within your own application, you’ll often need to simply launch a known activity. You can do so by creating an intent that explicitly defines the activity you want to start, using the class name. For example, here’s how one activity starts another activity named SignInActivity:

Intent intent = new Intent(this, SignInActivity.class);

startActivity(intent);

However, your application might also want to perform some action, such as send an email, text message, or status update, using data from your activity. In this case, your application might not have its own activities to perform such actions, so you can instead leverage the activities provided by other applications on the device, which can perform the actions for you. This is where intents are really valuable—you can create an intent that describes an action you want to perform and the system launches the appropriate activity from another application. If there are multiple activities that can handle the intent, then the user can select which one to use. For example, if you want to allow the user to send an email message, you can create the following intent:

Intent intent = new Intent(Intent.ACTION_SEND);

intent.putExtra(Intent.EXTRA_EMAIL, recipientArray);

startActivity(intent);

The EXTRA_EMAIL extra added to the intent is a string array of email addresses to which the email should be sent. When an email application responds to this intent, it reads the string array provided in the extra and places them in the “to” field of the email composition form. In this situation, the email application’s activity starts and when the user is done, your activity resumes.